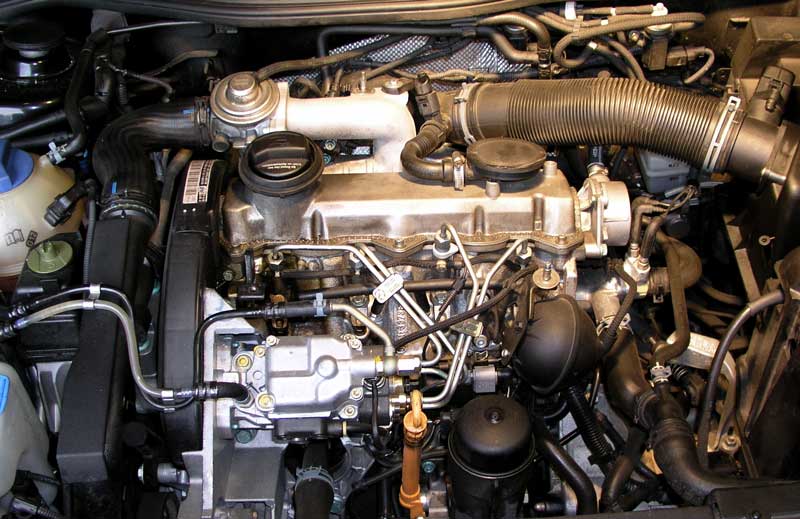
This is the engine of my “daily driver”… a 2002 VW Jetta TDI. It is a wonderful machine in that it is remarkably fuel efficient. Without any magic tricks or massive banks of batteries, or anything even remotely “ccol” to a Hollywood celebrity, it gets mileage figures that equal or exceed that of a Hybrid. It has 105,000+ miles on it, and just about every one of those miles took about two and half ounces of fuel. Every one of those miles have been essentially trouble free as well. All of my troubles with this car have been self-inflicted. =) The car itself has been wonderful, with only a single mechanical defect (the passenger-side window fell into the door not long after I bought it, and VW fixed that for free under warranty. There was later a recall for that one issue.) in all the years and miles I’ve had it.
There has been one other issue. The #1 injector started leaking last summer. I suspect that may also be self-inflicted, or it could be clogged due to age and soot build-up. So I set about to remedy the situation. I bought some new injector nozzles, and sealing washers and waited for a day when I could get it all done. I picked today (well… technically yesterday.)
It all started well enough. I printed out the Nozzle How-To from the TDI Club website wandered out to the barn and went to work.
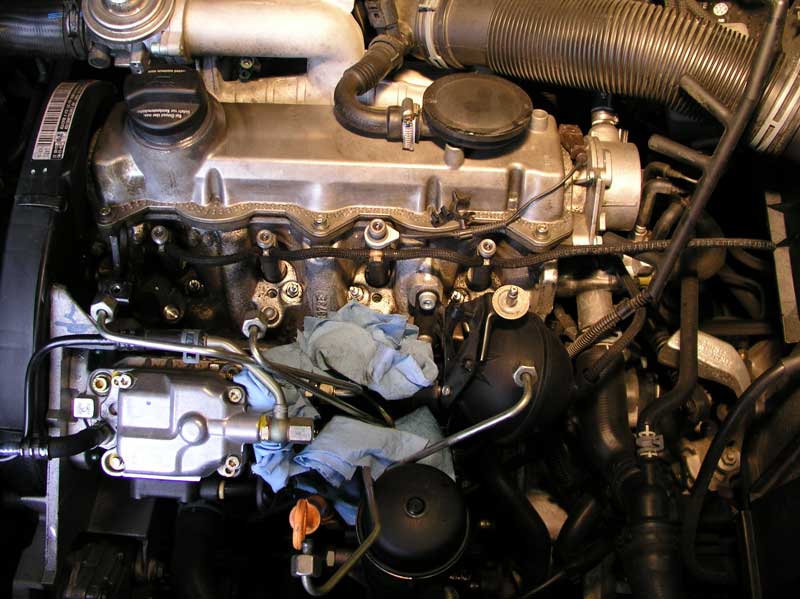
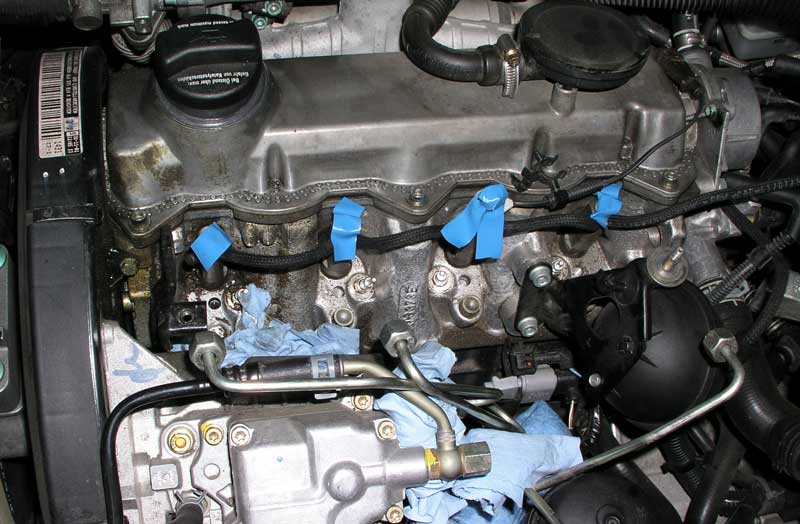
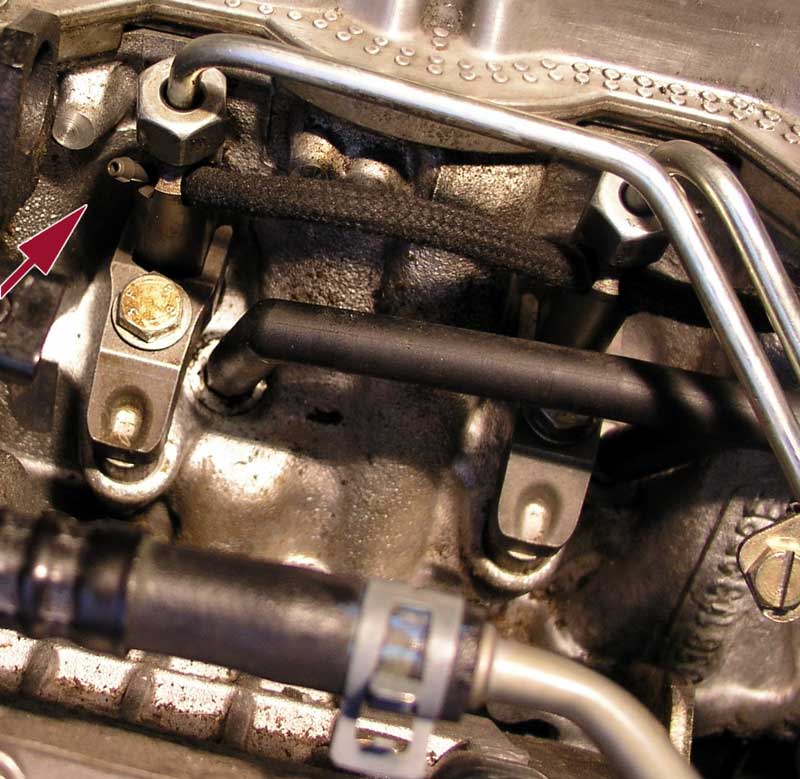
Above you can see the dirty area around the #1 injector (far left side of the engine) where fuel has leaked out and dried on the metal. I’ve also cracked off the fuel lines and removed the glow plug bus bar, which is leaning up against the air-intake pipe from the air cleaner box (right side of the frame.) The shop towels are there to soak up Diesel as it drips from the injector pump and fuel lines.
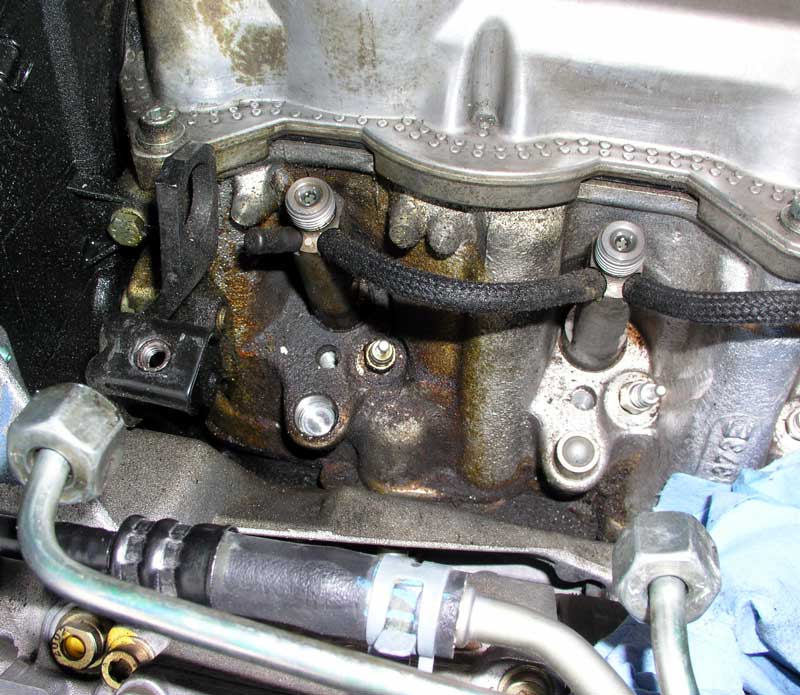
Above is a close-up of the #1 injector area, and the really yucky fuel residue. Note the nitrile rubber cap opposite the return line. It becomes important later.
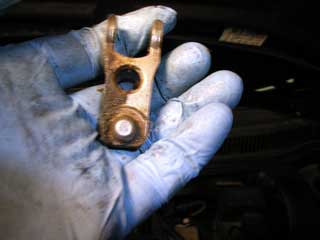
Above is the hold-down bracket for the #1 injector after I’ve cleaned half of it. Yuck.
This was taken just prior to the hardest part… working the injectors out of the head. I eventually went into town in the pickup specifically to buy a 15mm “crowfoot” socket wrench to work these loose. You basically work them out by rotation back and forth until they loosen. Once they loosen they lift right out by hand… but getting to that part took a LOT of working the parts around with the wrench. The tape is there to keep dirt out of the tops of the injectors while I’m working in there. The #3 injector is different from the other three, as it contains some of the electronic feedback mechanisms in it. The grip surfaces of it are subsequently lower and shorter. I had to remove the glow plug from the #3 cylinder to get enough room to rotate the injector with the crowfoot wrench.
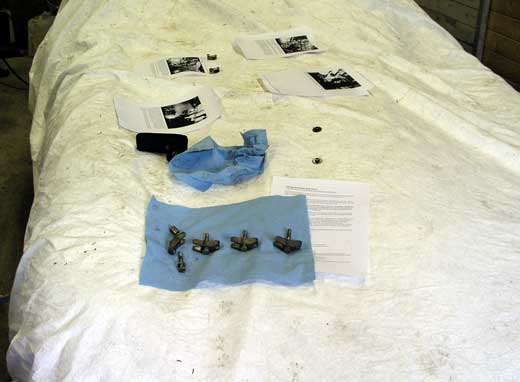
Since I am not a very good mechanic, I try to stay organized while I work. Here is an example. The paper is the printed out HOWTO and I place removed parts on the pages where the correspond. This reminds me when and where to replace them. You can see the injector hold-down brackets on the shop towel. Yes, that is the Jaguar under there. There are three layers of car cover so don’t worry. I would never put heavy parts on it!
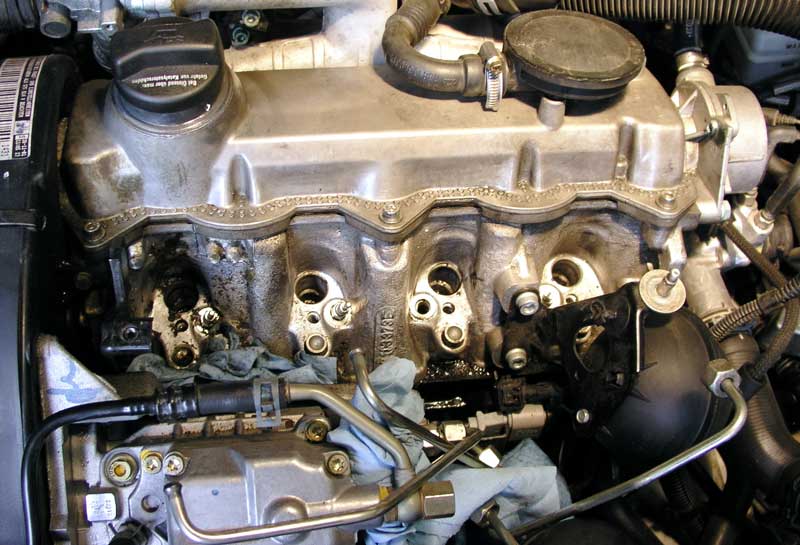
Above you can see all the injectors are out (plus the glow plug from #3.) I’ve started to clean up the dried on fuel residue and dirt. I used a shop-vac to suck the stuff out of the injector holes, along with a shop towel soaked in solvent wrapped around a flathead screwdriver and gently swabbed around in the hole. Eventually I got the whole area fairly clean and the injector holes spotless. The area above and around #1 took a solvent soaked toothbrush and a LOT of elbow grease!
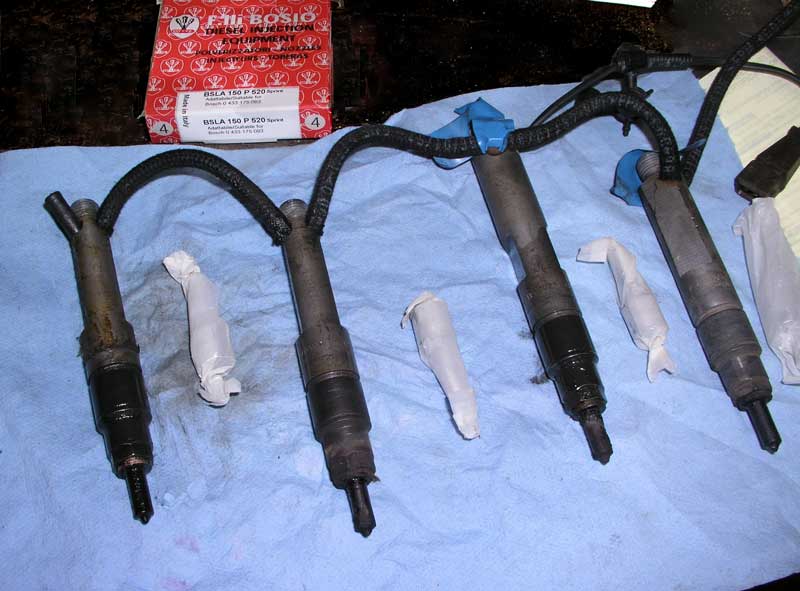
Above are my very sooty injectors. The nozzle replacement process is pretty simple, but requires some patience and precision. You have to put the injector body in a vise and rotate off a retaining collar (the darker grey area on #1 & #3 injectors.) Then you extract the nozzle and the copper sealing washer at the base of the nozzle. The rotation took a lot of muscle. Removing the nozzle required soaking the bottom half of the unit in Diesel fuel until it could be worked apart. Installing the new nozzles (still wrapped in paper and lying between the injectors above) involved laying onto the upturned injector body still in the vise, lining up some pegs in holes, then carefully dropping the retaining collar back on without upsetting the nozzle. All during this you can’t touch the tip of the nozzle with anything lest you clog it up with dirt or somesuch.
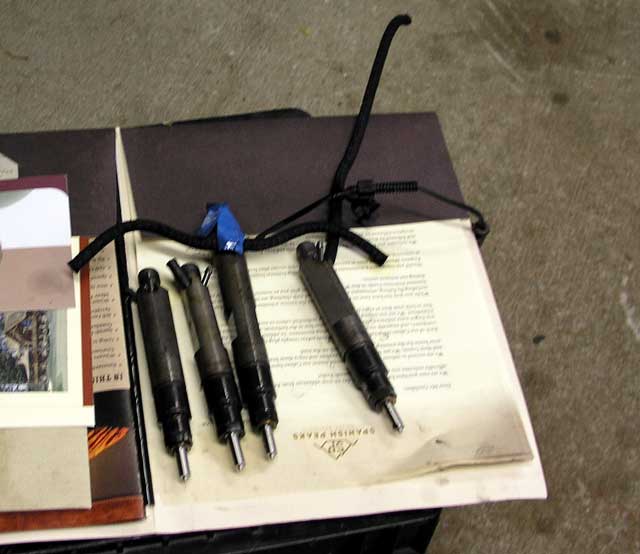
Above: the shiny new nozzles installed in the injectors.
The fuel return line looked a bit worse for wear, so I figured I’d go run into town and grab some new ones. The copper sealing washers I bought from VW were also a bit too tight and much thinner than the originals. So I grabbed a washer, one short length of fuel return line, and the rubber cap off the #1 injector and drove into town with Nick in the pickup. Since the #1 had been leaking I figured it would be a good idea to replace any of the rubber parts around it. Hence the cap. We went to NAPA. They were out of that size hose, and didn’t have copper washers in the size I needed. So we went next to Campbell-Nelson’s VW wrecking yard, where I got the replacement air cleaner box and the sealing washers. They didn’t have these sorts of things “in stock” but sent us out to the yard to see if we could find them on a wrecked car. Nick and I wandered around the yard in the rain, with directions on where to find the one Diesel car they had… an identical 2002 Jetta TDI to mine… same color, everything. Except it had been “T-boned” on the passenger side. The engine was gone, so no way for us to get the parts we needed. It was sad to see the hunddreds of wrecked VWs. There was one Passat with a gorgeous leather interior that was getting soaked by the rain as its windows had been smashed out in an accident! Oh well. We went home, stopping at Schucks and AutoZone with ZERO luck on the fuel return line (I didn’t even bother trying on the other parts!)
When I arrived home, I went back to the barn to finish up. I was able to make the copper washers fit OK with a bit of work. The injectors went back in fine. Everything came together well. UNITL…
I reached into my coat pocket to find that rubber cap for the return line and IT WAS GONE.
“D’oh!”
I must have dropped it at some point as we were out parts shopping!
I felt like a total moron.
I was able to rig up a plug. Enough so I could get the engine running again, but I will have to source a more permanent replacement before I drive the car any distance. What a dolt.
When I swapped out my injectors for Sprint520’s around 75,000 miles, my experience was much like yours. I remember reading that the stock copper washers are thicker and thus better than the replacements, so I rehabbed the stock ones by lightly sanding them on a flat plate covered with 1000 grit sandpaper. I had to clean out the #4 injector hole twice to get it to stop leaking, but other than that, the swap went fairly well, just like yours appears to have gone.
At least everything is back together and you’re running, Chuck. It could be worse. Much worse.
Oh I know Sandro!
My problem is that I am NOT a linear thinker, and performing mechanical tasks really requires linear thought, and linear processes. I’m actually *pretty* good at adapting myself to a linear process but I can’t allow myself to get distracted. If I had just used my brain, I would have realized that the return line parts in question could have been reused and changed literally in the parking lot of a parts store, without tools even, at some later date. Instead I let myself get fixated on replacing them “RIGHT NOW”… I really need to guard against that habit.
On the upside, I spent a few hours rehabilitating the air cleaner cannister I bought off eBay for the Jaguar last night. It is in shockingly good condition for a 40-year old part! The hardware on it was rusted shut, but some penetrating oil solved that. A VERY dusty old filter was in there, as well as an inside bottom covered in surface rust. The rest was in pretty good shape. I’m surprised at how heavy the whole thing is though.
…and chuckles discovers the *true* meaning of the term, ‘Jesus Parts.”
“I reached into my coat pocket to find that rubber cap for the return line and IT WAS GONE.”
Almost an excellent job! No man is perfect. But I must say you did an excellent job in fixing your vw jetta. And the most disgusting part of it is getting your hands dirty with this grease…