I’ve been insanely busy at work for the past several months, involved in managing and executing a large-scale project. This project eventually will spread throughout all of our various regions, but the largest, most complex, and first implementation of it is happening at my facility. It is one of those “all eyes on you” scenarios, so I’ve had my head down and working for many weeks – neglecting you my dear reader! I apologize for that.
I’m happy to say that today marked the “finish line” of that project. I still have a few things to do in order to wrap it all up, but the vast majority of it is DONE – so I’m happy. I’d celebrate with a nice bender, but unfortunately I’m also “on call” this week, so I’m drinking only iced tea. Oh well.
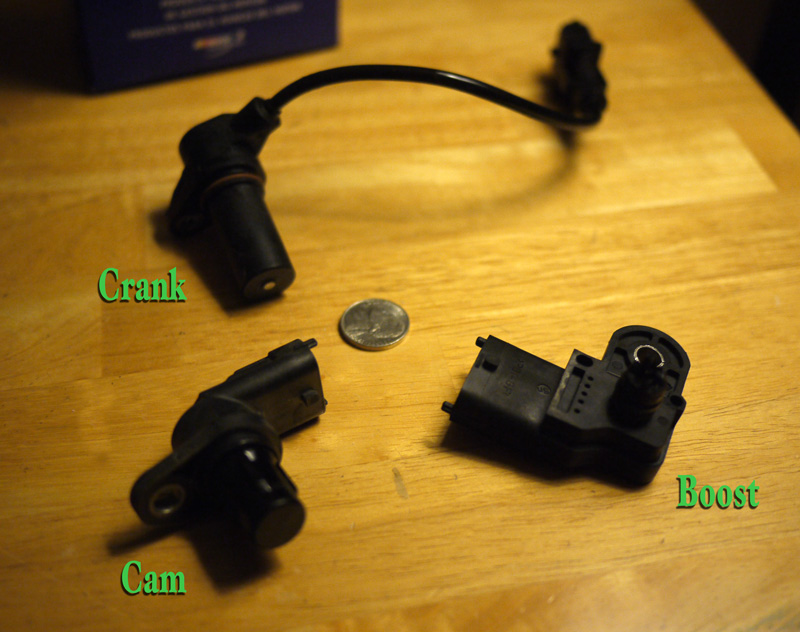
While I’ve been so busy, the Goolsbee family automotive fleet has suffered some setbacks. My car, the VW TDI is out of commission completely… a story that will have to wait for another day. Sue’s car, the Jeep Liberty CRD, is also not well, though it remains semi-functional – provided you are ok with it “failing to proceed” at random times. My OBD-II reader burps forth many sensor-related errors from the Jeep’s computer system. I’ve discovered that some parts for this car are made of the purest, pharmaceutical-grade Unobtanium found in the universe. This is especially true of sensors. I suspect two sensors are faulty, and I KNOW one additional one is completely FSCKed. The first two are the cam and crank positions sensors. These are what seems to be randomly shutting the engine down while underway. I was able to find the cam sensor online. I replaced it tonight (now that I’m free from the weight of this big work project, it is time to start fixing things at home!)in what can only be described as a tactical victory…
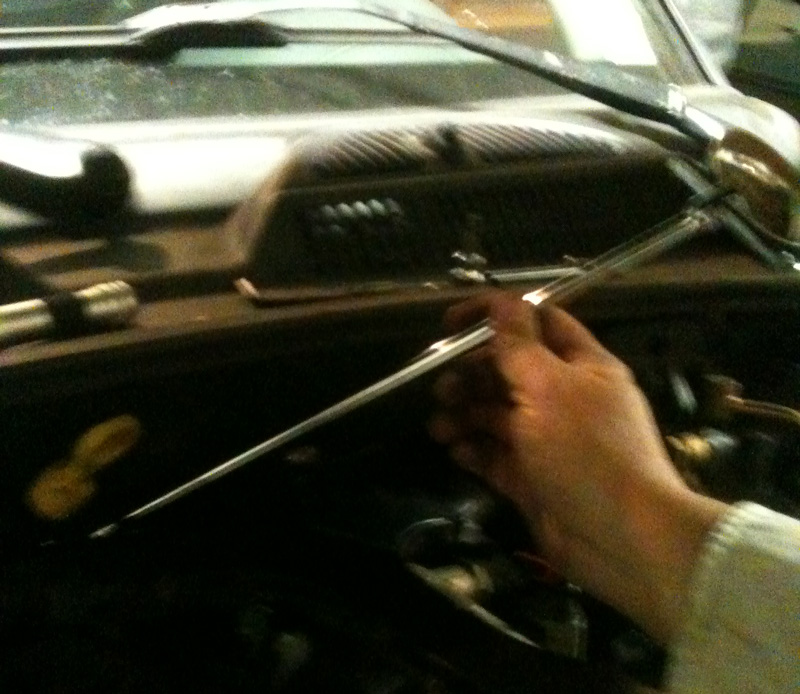
The Camshaft Position Sensor is found way at the back of the passenger side of the engine bay, sitting atop the cam cover, inconveniently tucked between the firewall, and the transmission fluid dipstick assembly. I accessed it by standing atop a spare wheel, and lying on top of the engine itself. It is held by a single 5mm Allen head bolt. I tried using a standard Allen key, but even a ball-headed one could not get enough purchase on the bolt to turn it. Thankfully I acquired a new tool a while back (I picked it up at HF when I was seeking a breaker bar and sufficiently large socket for my Jaguar’s rear axle nut last month. I saw it and thought “Damn, that looks handy!” I was proven prescient tonight in that regard.) It is a long T-handle, articulated ratchet:
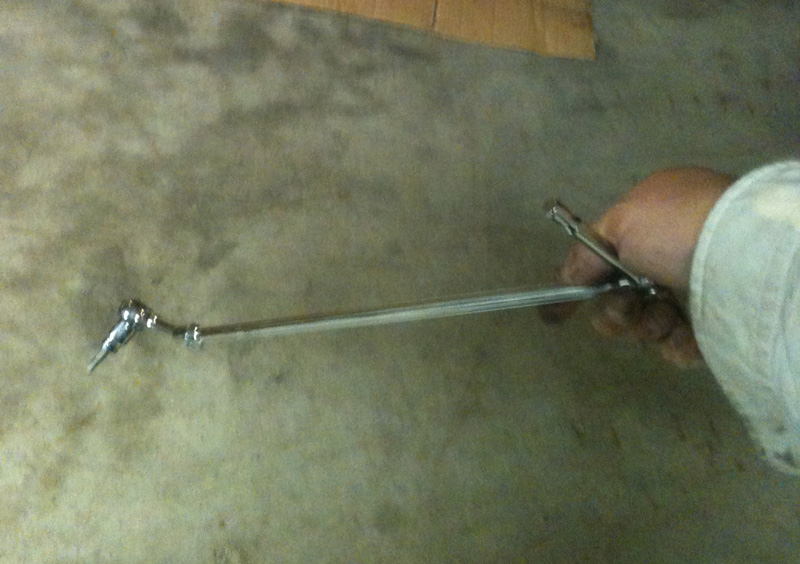
With a 5mm Allen socket attached, I could articulate it into just the right position to have it firmly sink into the bolt, then wiggle the handle back and forth enough to unscrew it.
The greatest victory tonight came when I realized a very important thing in the sensor replacement process. As soon as I unplugged the old one, I thought of plugging the NEW one onto the sensor wire harness. This way, once I had the old one out, the new one would be right there, and at no risk whatsoever of falling down into the abyss below this rather inaccessible spot. As I sit here patting myself on the back before you all, I recall something said on the E-type mailing list I’m on:
The most significant skill in car repair is NOT never making a
mistake, but much more recognising when you are about to make a
mistake, and knowing how to recover from said mistake.— Andrew Waugh, on jag-lovers.org E-type list, 4/2/2009
I think I’m *finally* getting pretty good at this stuff. 😉
But before I can get too smug, let me fill you in on where I came up short:
1. The boost sensor came to my attention when I was searching the Internet for the answer to question #2 below. I was aware of the Jeep’s long-time MAF sensor issues (I just gave up and unplugged the damn thing in 2007 or so and just live with the CEL) but just tonight learned of this other sensor in the intake system. Like the MAF it measures air, but on the intake cam in a position akin to the Cam sensor above. It can get gummed up and cease working. Sue’s was beyond gummed up – it was melted off! It is a Bosch part, with a clear part number on it (0 281 002 437) but just try finding one online. Most of the places are in eastern Europe! I finally found a MOPAR part number for it via a Jeep forum, and after searching on that, only found two places in the US with it listed in stock. The price with shipping is close just over $100(!) I swear, it is cheaper and easier to find parts for my 50 year old European car than this 2006 domestic SUV!
I bit the bullet and bought two. Even though they can be cleaned, I figured it will be safe to have a couple of them, just in case they become even MORE rare in the future.
2. I can’t even FIND where the crank position sensor goes! I spent easily 30 minutes over and under this engine (2.8L VM Motori CRD) looking for it – tracing every wire, looking in every dark corner and hole. No luck. Like the cam sensor, it looks like it will be a simple (though of course not easy) job to replace, as it is held by a single bolt and one wire.
I just have to find it. Then REACH it.
One step forward, three steps back.
Can’t wait to hear the TDI story, though I think you’ve got your money’s worth out of that vehicle.
The WRX we have was running like crap, especailly bad at 4500 rpm, one can of CRC MAF sensor cleaner later runs great. Wish all repairs were so easy.
I hear you on the parts. Most TR6 parts are easier to find and cheaper than many of their modern counterparts.
Good luck with the Jeep!
In the future, https://www.1stjeepparts.com/oe_parts_catalog.html is your friend. 😀
Glad you’re doing well. 🙂
Thanks Nick. I see I could have saved myself about $30 there. Next time.
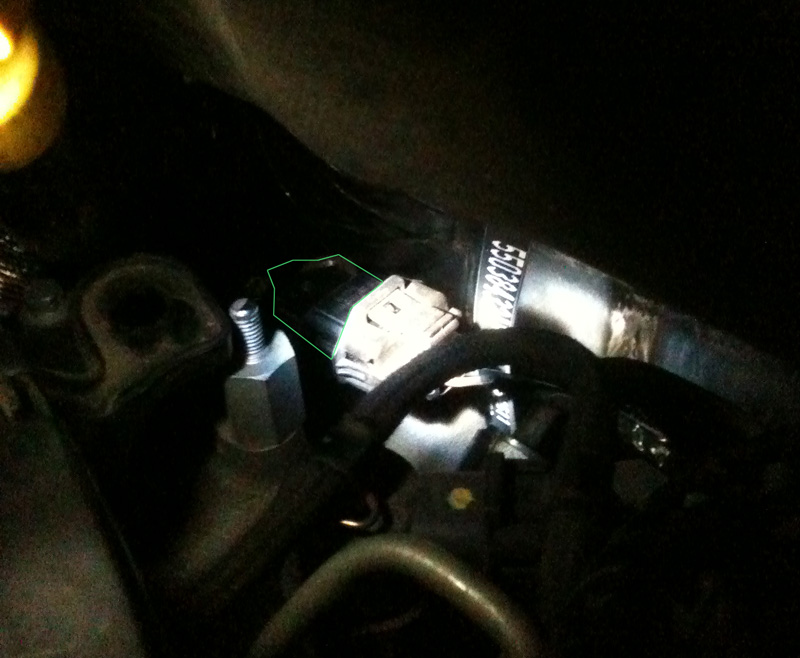
By the way, I found out where the CPS goes – on the block under the exhaust-to-turbo downpipe. Yes, I’ll be removing that tonight…
I’m sure it won’t be as easy as it sounds.
I’m exhausted for you, Chuck.
I ended up leaving the exhaust down pipe in place as I could not dislodge it. This meant I was working elbow-to-shoulder deep and working almost entirely by feel when it came time to reassemble. BUT – I got it done. Just waiting for the new boost sensor to arrive.
*NOW* you maybe perhaps sorta understand why there’s hardly a SINGLE day go by, that I don’t start off my day with the mantra, “Today, I no longer have to make my living by WORKING. ON. A. CAR!!!”
😉