I’ve never made this site a “link blog” but I had to share this one:
Top 15 unexpected uses for BioDiesel
Too bad it won’t cure baldness. 😉
goolsbee.org, serving useless content from an undisclosed location since 1997
I’ve never made this site a “link blog” but I had to share this one:
Top 15 unexpected uses for BioDiesel
Too bad it won’t cure baldness. 😉
In the last article in this series I covered washing BioDiesel. Now we move on to drying it.
After you wash BioDiesel it is (mostly) free of particulate impurities, but now it is contaminated with water. Tiny droplets of water remain in suspension in the BioDiesel. Water in your fuel is not a good thing. Removing it is easy, as oil and water naturally want to separate. You can just let it sit and nature will take its course. This is what I have been doing until recently. However sometimes you want to give nature a push. You can bring the BioDiesel into contact with as much air as possible. You can also heat it up. The best is to do both. This step is referred to as “drying”.
I generally let my washed BioDiesel sit for a week anyway, to let as much water fall out as possible. After that I run it through my Drying Tank. The Drying Tank is something I built recently and I’m REALLY happy with the quality of my fuel since I started drying it actively, rather than just letting it sit. In fact I have dried all the fuel I had sitting around for the past few months slowly settling.
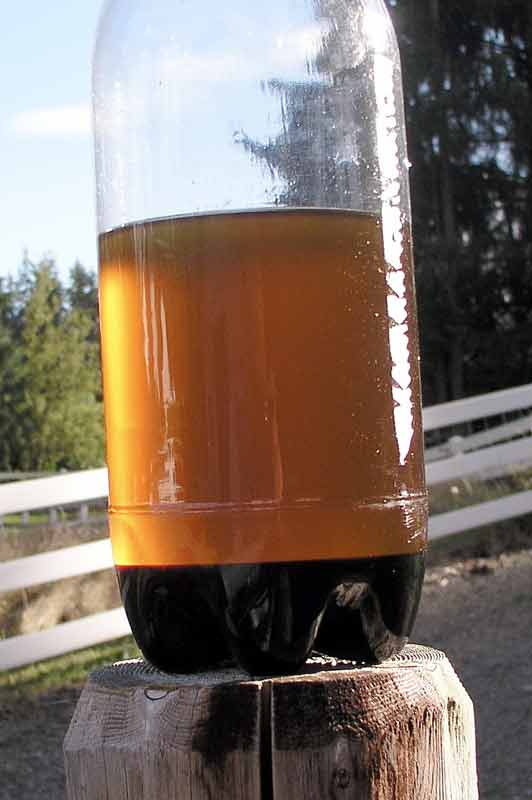
When the BioDiesel has been washed, and has water in suspension it looks like orange juice. See the photo above for an example. That is washed BioDiesel viewed through a clear tube. Note how opaque it is.
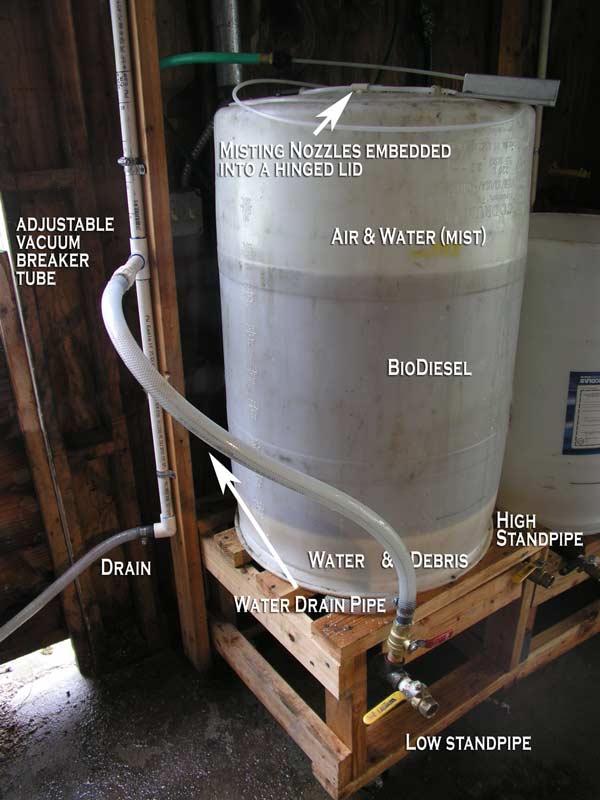
To dry the BioDiesel, it goes in here:
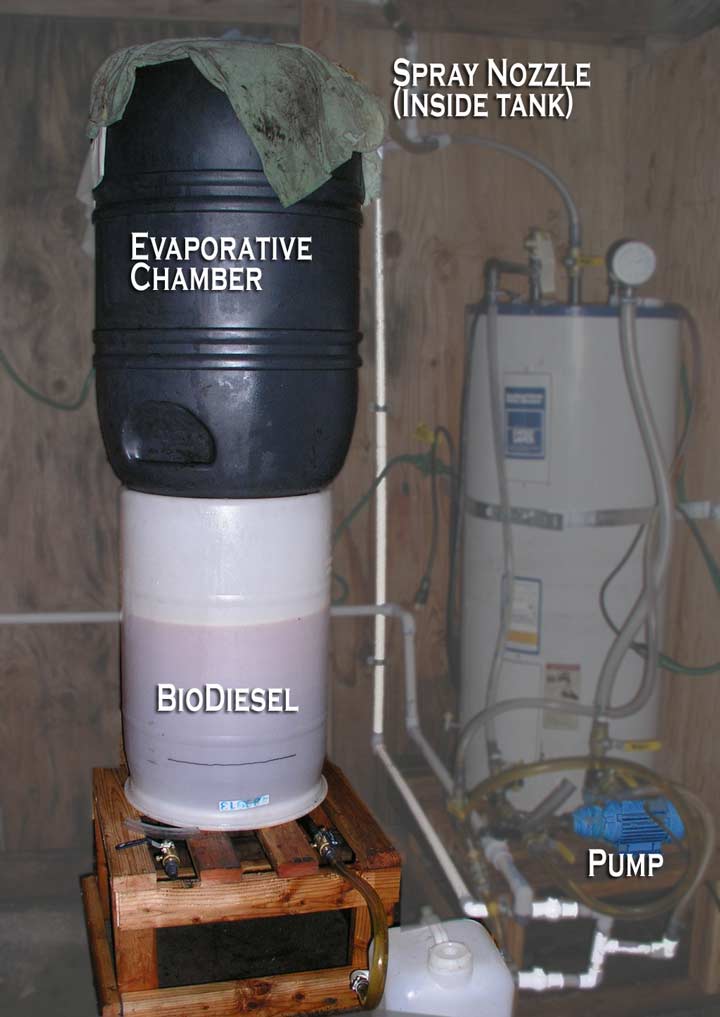
This is my drying tank. It is basically an inverted barrel with standpipes in the bottom. It has been cut around the rim of the top (formerly the bottom) and had a larger, contoured barrel placed into the hole. This barrel has a set of perforations drilled into the very top, along with a hose from the pump run through a hole in the top, fitted with a wide-angle spray nozzle. The BioDiesel is pumped up to this nozzle and sprayed onto the interior surface of the top barrel. It flows down the sides and then falls into, and collects in the bottom barrel, where it drains through one of the standpipes into the pump again. By recirculating the BioDiesel into this cooling-tower-like structure it is exposed to a lot of air. (You will note a dirty old t-shirt at the top of the tank. I added this to keep the BioDiesel mist from leaving the tank and covering the barn with an oily residue. Air can still pass through it, but most of the mist is contained.)
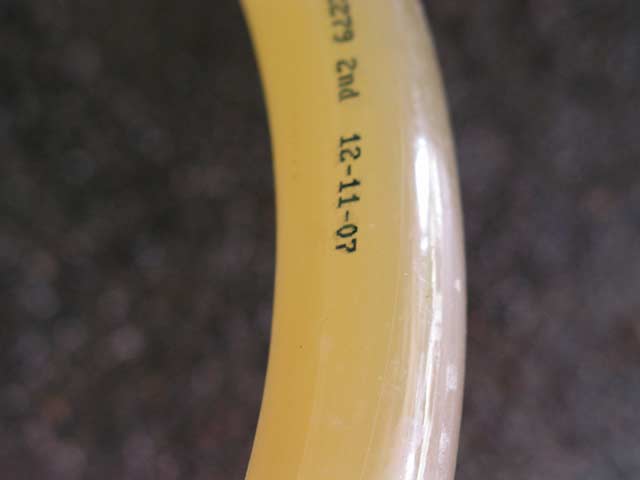
Over time, the BioDiesel clears up as the water is forced out by the drying process. I suspect that most of the water evaporates out of the oil. I have noticed that it also separates out of the oil and pools at the bottom below the level of the standpipes. The oil clarifies and becomes very clean looking:
Note how clear it is!
Heat seems to speed the drying process up quite a bit. My drying tank has no heater so if it is cold, I can pre-heat the washed BioDiesel inside my reactor.
After it dries, the BioDiesel is pumped into my gravity-fed final settling/filtering tanks, which I’ll illustrate in a future post. Stay tuned for more.
On one of my favorite car-guy blogs today: The Truth About Cars.
In the last post in this series I discussed testing & reaction. After the processor is finished I move the whole mixture into my wash tank and let it sit for a week or so. The glycerin settles and I drain it off the bottom.
Next comes washing. Washing is a step whose aim is to remove impurities from the BioDiesel. Even after it settles for a week, the BioDiesel has impurities in it. These are mostly in the form of microscopic food particles. Washing assists in removing these. Again, I am not a Chemist, I just play one at home on the weekends, so the following may not be true, but here is what I understand happens: Water droplets attract the impurities as they fall through the water as the food particles are hydrophilic. The wash tank puts a fine water mist above the BioDiesel. It falls and collects on the surface of the oil then falls through the oil to the bottom. Along the way it picks up impurities.
I have a continuous mist wash tank. This utilizes a drain pipe with an adjustable vacuum tube. By moving the tube up or down I can control the level of liquids in the tank and prevent it from overflowing. Dirty water drains out, but oil is kept in. The water collects in a barrel outside the barn.
I run the water through until it runs clear. At first it is grey and cloudy as you would expect water mixed with a lot of potato and flour particles. Eventually it clears up as the impurities are removed from the BioDiesel.
When the wash is complete the BioDiesel is now contaminated with water. This however is easier to deal with than food particles as separating what is basically oil & water is pretty easy. You can let it sit for an extended period of time, or you can “dry” it. I’ve done this both ways, and that will be the subject of the next post in the series.
I mentioned before that washing is a mildly controversial issue among home brewers. There are risks involved, the primary one is emulsification. This is when your BioDiesel turns into a cream-colored glop that looks like pancake batter. From what I understand this is caused by an incomplete reaction and/or the presence of soap. Washing also involves using water and in some parts of the world water is a scarce thing. I’m not too worried about the latter living here in the Pacific NorthWET. I have had issues with emulsions, and in fact I stopped washing through this entire past winter. Instead I’ve been letting my fuel sit in vented storage barrels to settle. Now I’m washing again and my quality seems to be going up. I think my main issues before was not taking enough time. Time is on my side and I just have to be patient. Allowing the processed BioDiesel to sit for a few days before washing seems to really help. Building my drying tank has taken it that much further.
Next up: Drying washed BioDiesel.
In step one I covered collection, filtering, and settling the waste vegetable oil. Next comes the actual process of chemical conversion to BioDiesel. This is the most complex portion of the process. Plenty has been written online about this, so I’ll provide links for details and really just touch the highlights here. Please be aware that I am NOT a chemist, so this write up is overly simplified for non-technical readers. Don’t get too nitpicky with my generalizations, ok?
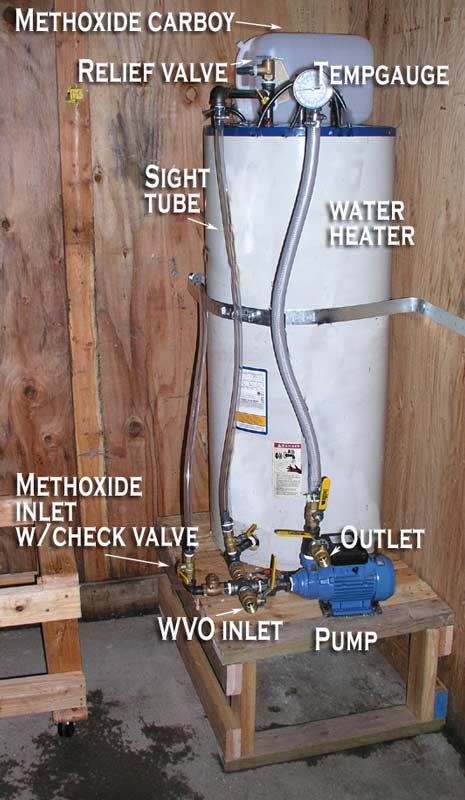
I move the WVO into the processor. The processor is basically an electric hot water heater that has been modified. The top heating element has been bypassed so only the bottom element remains active. Attached to the tank is some plumbing, valves, and a pump. The plumbing allows the oil to be recirculated through the processor as a closed system, or pumped in or out. At the top of the recirculating plumbing is a temperature gauge so that I can monitor the temperature within the reactor. The plumbing also provides a view to the level of oil inside via a sight tube, which I have calibrated with marks at 5 liter increments. At the top of the processor is a pressure relief valve, and a ball valve that allows me to vent the reactor. I have plumbed this through the wall and outside the barn with a hose.
After the oil is inside the reactor the heating element is turned on and the contents are heated to between 48° – 55° C (120° – 130°F.) The pump is run to ensure the oil is well mixed. Once the oil reaches the desired temperature I turn OFF the heater element. The next steps involve flammable liquids so it is best to remove heat sources. The element is surrounded by veggie oil, whose flash point is very high, but why risk it? The water heater tank is well insulated, and I have found it will hold the oil at the proper temp for many, many hours. No need to keep the heater on at this point.
In order to process you must first analyze the oil in a procedure called titration. Using the result of the test allows you to build a recipe to process the oil into BioDiesel. You use a set of fixed chemical amounts and introduce a marker and a single variable. When the marker shows a color change you have determined a value to enter into your recipe. A step by step guide to the titration of WVO is found here. I usually perform three tests and average the result to build my recipe.
The recipe is basically an amount of two ingredients to introduce into the oil. The primary chemical that does the work is a strong base. I use Potassium Hydroxide (KOH) which comes as white flakes. The amounts of the strong base used are relatively small, roughly 7% of the volume of waste veggie oil. However you can not just mix it in. You need to make a solution that will allow you to introduce it into the oil and create a reaction, resulting in a process called “Transesterification.” The ingredient used to make that solution is Methanol (MeOH). You generally use an amount of methanol equal to 22% of the volume of waste veggie oil. I wasn’t paying attention in Junior High Math class (I was doodling pictures the entire time… really) so I use a handy recipe calculator once I have finished my titration process.
Both KOH and MeOH are rather nasty chemicals.
KOH is caustic, and will cause chemical burns if it gets on your skin.
MeOH is poisonous, and will cause blindness, or even death.
I wear thick chemical-proof gloves, a chemical-proof apron, a respirator and a face shield when I deal with these chemicals. I also do all my mixing in an open area, out of the rain, but not enclosed. Lots of ventilation and a water supply very close at hand.
I store my KOH in a airtight, waterproof, sealed plastic drum. Inside the drum is the bag it comes in and that is kept closed. I use a plastic garden trowel to measure out the KOH and that trowel stays inside the drum, but outside the bag. I never touch this trowel with an un-gloved hand.
I buy my MeOH in a 55 gallon drum, but it is stored inside our Diesel fuel bunker at work, since we have a fuel storage permit there, and it is a safe environment. I have a rotary pump on the drum and bring home MeOH in a 5-gallon container, since that is the maximum amount that I ever use. I never touch the methanol. It moves from the drum to the container with a hose, and I always wear chemical-proof gloves when handling the container or pump. The only time the MeOH is exposed to the air is in the mixing process I’m about to describe:
Making Methoxide.
Once the recipe is determined, I measure out KOH on a digital scale with a tray that can hold close to 2kg. Once the right amount is measured it is transferred into a carboy (a large 22 liter HDPE container with a built-in screw-cap vent. I use a large funnel which has screw-on covers at either end to make sure that no amount of either chemical is spilled in the process. The carboys have been calibrated with liter markings on the outside so I can then add the right amount of MeOH into them.
I seal the carboy’s large opening, but crack open the vent. The resulting chemical reaction between the KOH & MeOH generates heat and some gas, so it must be vented. I let this sit, usually for 30 minutes or so, until all the KOH is completely dissolved.
Inducing Transesterification
The Appleseed BioDiesel processor is a fantastic design in that it allows the chemical reaction to happen with minimal risk to the operator. The entire system is easy to build with materials found at any hardware store, and the exposure to these chemicals is minimized since the system is essentially closed.
The carboy attaches to the processor via a special lid, which has a hose coming out. By cracking open the carboy and processor’s vents, and then opening the methoxide inlet (with built-in check valve to prevent oil from coming back up the inlet line) you can control the mixture of the chemicals. From what I understand You want to slowly add the methoxide to the oil so that it is evenly distributed. I usually do 90 liter batches of oil, so I have roughly 20 liters of methoxide to mix in. I allow it to enter at a rate that drains the carboy in about 10 minutes. The carboy sits on its side on a shelf at about waist height. I never get it too high off the ground as if the carboy were to leak or break, the resulting splash could be quite hazardous! I’m paranoid so I wear my gloves and face shield until I’m confident that everything is going well. At this point the processor is doing all the work. The pump circulates the mixture and better living through chemistry is on the way.
I’ve never, ever read any guide that tells me how long to let the process run. From what I have observed it continues as long as the three main elements are present. I usually let the processor run for several hours, even overnight if I start it later in the evening. When I believe the process is complete, I use the ball valves and my plumbing to move the mixture into the next bit of equipment in the process, the wash tank.
The washing of BioDiesel is one of those passionately discussed topics, and it is likely the most misunderstood. It will be the topic of the next installment of this series. Before that however is one more small step: separation.
I have learned after many months of home brewing fuel that time is on my side. The slower I go, the better my fuel. The rhythm I have fallen into is “cooking” my BioDiesel on the weekend, and letting it sit in the wash tank for the full work week before I separate it. I imagine (remember, I’m NOT a chemist, so this is just a hunch on my part) that the reaction continues as it sits in my wash tank. The process likely slows to a crawl as the mixture cools to ambient temperature. Gravity also works on whatever stuff might still be in suspension… microscopic food particles mostly. The byproduct of BioDiesel production is Glycerin. This falls out of the mixture and settles at the bottom of the tank. It is a thick, black liquid that looks very much like the stuff in your lava lamp… except it is black. The stuff floating above the glycerin is BioDiesel.
Just like the settling tanks I described last time, the wash tank has a two-level drain system. One drain removes the glycerin off the bottom of the tank. I pour it off into “cubees” (the roughly 5-gallon box-shaped HDPE bottles the virgin oil is sold to restaurants in) and set it aside. I’ll address dealing with the byproducts in a later post.
Next up: Washing.
The first step in making BioDiesel is collecting your “feedstock”… that is the vegetable oil used to make it. I use Waste Vegetable Oil (WVO) from restaurant deep fryers. It is darn near impossible to get it from around home, as there is a commercial BioDiesel producer within 10 miles of my house who has locked up all the local sources. Instead I collect it closer to work. Right now I have two sources, which are part of a small cooperative really. My friend John, who I met when he replied to a job I posted on Craigslist many, many years ago, and a new source Mike, who I met via the Northwest BioDiesel discussion mailing list. Both of them supply me with waste oil, and in return I supply them with finished BioDiesel.
John first turned me onto the idea of running the car on veggie oil. At first I did straight veggie oil in the car, mixed with petroleum Diesel. I built a two-barrel WVO filter setup that was completely gravity operated. For a year or two I just filtered the oil down to 1 micron (which took a lot of time BTW) and poured it in my tank at anywhere from 10% to 50% mixture based on ambient temperatures. This worked OK for a while, but did eventually clog one of my injectors. This, and the rising price of oil, is what prompted me to go 100% BioDiesel.
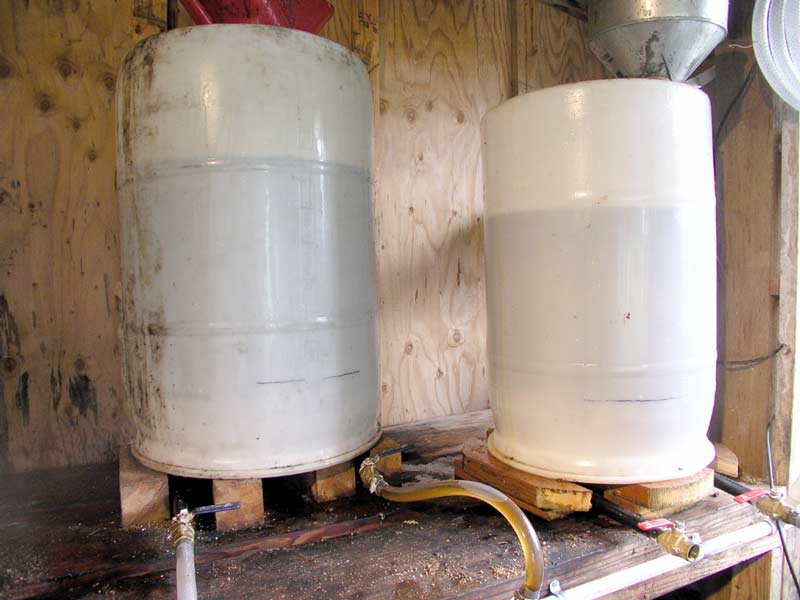
So step one is still filtering and settling. However unlike the old days, I don’t have to be so anal in my filtering (that still happens, just later.) Now I collect the oil, which comes to me in 5 gallon buckets, and pour it into these two tanks you see above. I can filter/settle close to 100 gallons of WVO at a time here. Time & Gravity are my main tools. The oil goes into the top via funnels. Attached to the funnels are coarse filters which remove the larger food bits (whole fries, potato bits, etc) from the oil. I use paint strainers, old panty hose, socks, whatever. Panty hose is actually the best. The filter media eventually clog with sludgy gunk, but we’ll worry about that later. Once inside the barrels the oil sits for at least a week, preferably two weeks. As it sits the water that was in suspension falls to the bottom of the tank. Suspended food particles also sink.
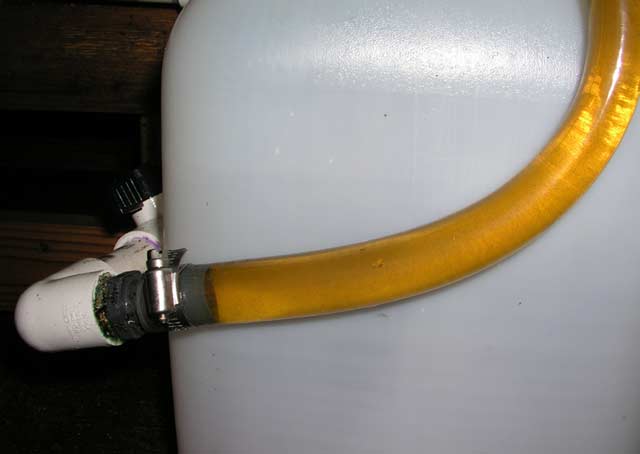
You will note that the barrels are upside-down, with the dual-bung tops now on the bottom. Into these bungs I have plumbed two NPT-threaded 3/4″ pipes with ballvalves on the end. One has an extension that sticks up into the oil to the level of the line you see drawn on the front of the tank. The other is flush with the tank’s bottom. When I draw off oil I use the higher of the two pipes. This means I draw oil from the area above the sediment. I can drain off the water and sediment using the bottom/flush pipe. This stuff is unusable and is discarded. The oil goes from the settling tanks straight into the BioDiesel reactor.
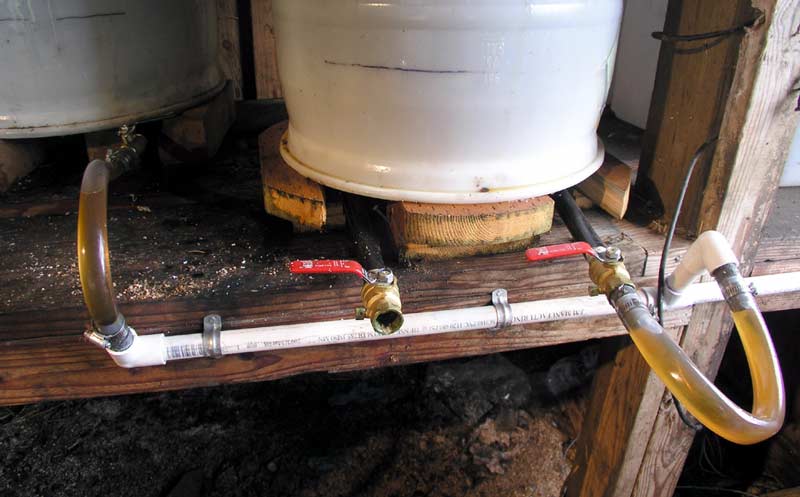
Up until last week I used a removable hose to drain the oil from these tanks. The hose screwed onto the ball valves you see on the end of the pipes. Last week I finally installed some plumbing to make this operation a lot cleaner. Now I’m not dripping WVO as much. I can just open some valves and flick on the reactor’s pump. Oil just flows into the reactor vessel without getting my hands dirty! (There are still some hoses to connect, but these are further downstream.)
So the key here, and the key overall to this whole process, is time. The longer the WVO sits, the better and cleaner the oil becomes. I alternate which tank I use every weekend, allowing the other to sit another full week to settle. I come close to filling each one every week, so the supply is consistent.
The next steps in the are testing & reaction, also known as “Better living through chemistry!”
Stay tuned for that.
What would you think leads most people to this website?
Guessing games about oddball old cars? Nope.
Stories about vintage car rallies? Nope.
Commiserating about unscrupulous mechanics? Nope.
When I look at my website stats the #1 search term month after month is “WVO Filtering”… pretty odd stat for a site mostly about my noodling about with a gasoline-powered vintage car eh? I guess people are more interested in my mundane daily habits than my occasional sunny-day passion. Oh well. So I’ve decided to give the people what they want.
I’ve been slowly building and trying to perfect a small BioDiesel processing system out in my barn, and while I’ve mentioned it a couple of times before here I promise over the next few weeks to lay out what is involved, and what components are used. Unlike my “beauty shots” of old cars that usually grace this website, I’m going to be honest with you, this stuff is ugly. Making BioDiesel from waste vegetable oil is a filthy, dirty job. As a result, the area where I do this dirty job is not very pretty.
Let me remind everyone of one important point: I’m not doing this to save the planet. I do this to save my wallet. You can call it enlightened self-interest, but really it is just an expression of independence. I’ve driven Diesel cars for a long time; half the cars I’ve owned in life have been powered by Diesel engines. I’ve done this because they are efficient and frugal… sort of like me. 😉 This process is no different in nature.
I’ve always been curious about things mechanical, and so embarking on this particular journey seemed natural, though it has been a slow process. I’ve had help from other people along the way, and I’ll try to mention them here. I am by no means finished, and I know as things evolve they’ll improve, so don’t view this as a definitive series on homebrewing.
Stay tuned as I explain it all starting from the beginning.